Quicklinks:
Preparing for DIY Epoxy Flooring Installation
Step-by-step Guide to Applying Epoxy Coating
Maintaining Your DIY Epoxy Coating Flooring
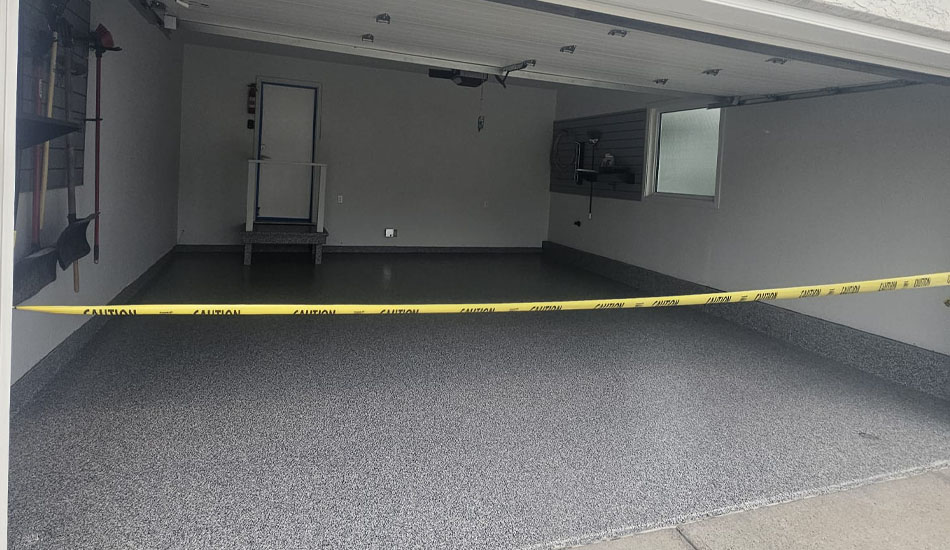
Epoxy flooring has gained popularity as a versatile and durable solution for both residential and commercial spaces. Known for its impressive resistance to wear and tear, chemical spills, and heavy foot traffic, epoxy floors offer a seamless and aesthetically pleasing finish. They are particularly favoured in areas like garages, kitchens, and industrial environments where durability is paramount.
While hiring professionals for epoxy floor installation is always an option, many homeowners and DIY enthusiasts opt to undertake the project themselves. Tackling a DIY epoxy floor installation can be incredibly rewarding, providing a sense of accomplishment along with cost savings. It’s essential to approach the task with the right knowledge and techniques to achieve results that rival professional installations.
In this ultimate DIY epoxy floor guide, we’ll walk you through every step of planning, preparing, and executing a successful installation. Our aim is to equip you with all the information needed to enjoy the benefits of a stunning and long-lasting floor finish.
For demanding, heavy traffic environments like locker rooms and driveways, where standard epoxy might not suffice, we recommend considering a more robust solution such as Sparta-Quartz Flooring offered by The Garage Store. This specialized flooring system provides enhanced durability and resilience.
Additionally, if you’re based in Airdrie or face intense weather conditions that can take a toll on your garage floor, it’s crucial to choose the right type of flooring. The Garage Store offers professional installation services for garage flooring in Airdrie, ensuring that your floor can withstand even the harshest elements while maintaining its aesthetics.
By following this guide along with considering specialized flooring options like Sparta-Quartz or seeking professional installations in specific regions such as Airdrie, you’ll learn how to transform your floors into beautiful, durable surfaces that can withstand the toughest conditions.
Understanding Epoxy Flooring
Epoxy flooring is a highly sought-after choice for homes and businesses due to its durability and aesthetic appeal. This type of flooring is composed of two key components: resin and hardener. When these elements are combined, they undergo a chemical reaction that forms a seamless and robust surface.
Composition and Properties
Two-Part System: Epoxy flooring relies on a two-part system consisting of resin and hardener. The combination of these components results in a curing process that transforms them into a resilient and long-lasting surface.
Durability: With the ability to withstand heavy foot traffic and various environmental factors, epoxy flooring stands out for its durability. This makes it an ideal option for areas with high usage such as garages, kitchens, and industrial spaces.
Unique Benefits
Chemical Resistance: Epoxy floors offer remarkable resistance to chemicals, making them suitable for spaces prone to spills. Whether it’s oil spills in garages or the frequent use of cleaning chemicals in kitchens, epoxy floors can handle it all.
Wear and Tear Resistance: Designed to resist scratches and impact damage, epoxy flooring maintains its appearance and structural integrity over time with proper maintenance.
The combination of these properties not only enhances the longevity of the floor but also makes it a practical solution for various applications. However, if you’re exploring alternatives before committing to an epoxy floor, temporary solutions like HandiWALL Slat Wall Systems or SwissTrax Tiles can be considered. These options provide flexibility while still allowing you to make improvements until you’re ready for a permanent flooring solution.
Understanding these key aspects sets the foundation for successfully planning your DIY epoxy floor installation.
Types of Epoxy Floors
We could get very technical when it comes to the “types” of epoxy flooring that are available but to keep things simple for the DIYer at home… we’ve broken them down into 3 different types.
Type 1) Solid Color Epoxy Floors
Solid color epoxy floors offer a timeless and classic aesthetic, providing a seamless and uniform appearance to any space. This option is particularly popular for those seeking a clean, professional look in both residential and commercial settings.
Advantages of Solid Color Epoxy Floors
Hiding Imperfections: One of the significant benefits of solid color epoxy floors is their ability to hide imperfections in the underlying concrete substrate. The thick, consistent layer covers cracks, small holes, and other blemishes, offering a flawless finish.
Enhanced Durability: Compared to thinner coating options, solid color epoxy floors provide enhanced durability. They are highly resistant to wear and tear, making them ideal for areas with heavy foot traffic or mechanical use.
Ease of Maintenance: The seamless nature of these floors means there are no joints or grout lines where dirt and grime can accumulate. This makes cleaning straightforward and effective.
Thickness and Curing Time
The thickness of the epoxy layer significantly influences both the strength of the floor and the curing time required for it to fully harden.
Thicker Layers
Strength: A thicker epoxy layer offers superior durability, capable of withstanding higher levels of impact and abrasion. This makes it an excellent choice for garages, workshops, and industrial environments.
Curing Time: However, thicker layers require longer curing times. Proper curing is essential to achieve the desired hardness and longevity of the floor. It’s crucial to follow manufacturer guidelines regarding curing times to ensure optimal results.
Thinner Layers
Strength: While still durable, thinner layers may not offer the same level of protection as thicker ones but can be suitable for areas with lighter use.
Curing Time: Thinner layers cure faster, allowing for quicker turnaround times on projects.
For those interested in a high-quality installation kit that ensures durability and dependability, you might want to explore the Frontline FRO-E12 from The Garage Store Calgary.
Type 2) Decorative Epoxy Floors
Decorative epoxy floors elevate the visual appeal with endless design possibilities. By incorporating coloured swirls, metallic pigments, or decorative flakes, these floors not only look stunning but also offer practical benefits.
Visual Appeal: Customizable designs make each floor unique, allowing you to tailor the look to match your personal style or brand identity.
Slip Resistance: Decorative elements like flakes can add texture to the surface, improving slip resistance—a valuable feature in kitchens or garages where spills are common.
Enhanced Durability: Just like solid color epoxy floors, decorative epoxy floors are durable, capable of withstanding heavy foot traffic and impact.
Epoxy floors offer a versatile range of design options in addition to their functional benefits. They can be customized to suit different aesthetic preferences and enhance the overall look of a space. Decorative epoxy floors allow for endless design possibilities with the use of coloured swirls, metallic pigments, or decorative flakes.
Key Features and Benefits
Coloured Swirls and Metallic Pigments: These elements can create unique, eye-catching patterns that add depth and dimension to any room. Whether you want a subtle marbled effect or bold, dynamic designs, these options provide a high level of customization.
Decorative Flakes: Incorporating decorative flakes into the epoxy mixture not only enhances visual appeal but also adds texture. This texture can significantly improve slip resistance, making it an ideal choice for areas prone to spills, such as kitchens and garages.
The choice of finish is an important consideration for both appearance and performance. Different finishes may have varying levels of reflectivity and texture, as well as specific maintenance requirements:
Glossy Clear Coat: Offers a high-shine effect that makes cleaning easier but may show imperfections more readily.
Matte Topcoat: Provides a more subtle look that hides imperfections better but requires careful cleaning to maintain its appearance.
For those looking for robust protection against weather conditions while maintaining aesthetic value, the Tsunami Seal Garage Seal offers a practical solution. This seal is specifically designed to fit between your garage door and floor, preventing wet weather and debris from making its way into your garage. Another option worth considering is the Sparta-Stain Floor Sealer, which is a highly decorative floor sealer that improves the look of any concrete floor, serving as a popular alternative to polished concrete.
Decorative epoxy floors provide an excellent balance between style and practicality. With the right choice of design elements and finishes, they can transform any space into a visually stunning and highly functional area.
Type 3) Other Finish Options for Epoxy Floors
Beyond solid colours and decorative enhancements, there are additional finish options available:
a) Glossy Clear Coat: A high-shine effect that adds an elegant touch to any space.
b) Matte Topcoat: Provides a more subtle and understated look.
Each finish option comes with its own set of pros and cons. Choosing between them depends on your needs.
Pros and Cons:
Glossy Clear Finish:
Pros:High reflectivity enhances the brightness of a room.
Easier to clean due to its smooth surface.
Cons:Tends to show imperfections like scratches or dust more visibly.
May require more frequent maintenance to keep its shine.
Matte Finish:
Pros:Hides imperfections better, making it ideal for high-traffic areas.
Offers a sophisticated, muted aesthetic that suits various interior styles.
Cons:Less reflective, which may not be suitable for spaces that rely on light reflection.
Can sometimes be harder to clean due to its textured surface.
Epoxy floors offer a versatile range of design options in addition to their functional benefits. They can be customized to suit different aesthetic preferences and enhance the overall look of a space. The choice of finish plays a crucial role in both the appearance and performance of an epoxy floor. Different finishes may have varying levels of reflectivity and texture, as well as specific maintenance requirements.
Considerations for Choosing a Finish:
Reflectivity: High-shine finishes like glossy clear coats can make rooms appear brighter but may highlight imperfections.
Texture: Matte finishes provide better slip resistance and hide wear and tear but might require different cleaning techniques.
Maintenance: Glossy surfaces are easier to wipe down but need more frequent upkeep to maintain their appearance. Matte finishes hide wear better but can trap dirt in their texture.
Epoxy floor finishes can significantly impact both aesthetics and functionality. Carefully consider your space’s needs before deciding on the appropriate finish option.
If you’re looking for expert assistance in epoxy flooring installation, concrete coatings, tiling, and more, companies like The Garage Store provide top-notch garage flooring solutions in Calgary. They offer safe installations, scratch-free coatings, and water-resistant finishes. Additionally, if you require overhead storage solutions to complement your epoxy floor, The Garage Store offers a wide range of options including ceiling racks, bike lifts, hoists, and shelves in Cochrane, Alberta. By understanding these aspects and seeking professional help where needed, you will be better equipped to choose the right finish for your epoxy floor, balancing beauty with practicality.
Steps for Preparing for DIY Epoxy Flooring Installation
Preparation Step 1. Surface Preparation Methods for Epoxy Floor Installation
Surface preparation is crucial when planning a DIY epoxy floor installation. Ensuring that the concrete floor is properly cleaned, repaired, and prepped will significantly impact the durability and appearance of the finished epoxy floor.
1.1) Shot Blasting
One of the most effective methods for surface preparation is shot blasting. This process involves propelling small steel beads at high velocity onto the concrete surface. The impact from these beads:
Removes contaminants like oil, grease, and dirt.
Creates a slightly roughened surface profile that promotes strong adhesion of the epoxy coating.
Helps to eliminate any weak surface layers, ensuring a more robust bond between the concrete and the epoxy.
Shot blasting can be particularly useful in spaces like garages or industrial areas where the floors have been exposed to significant wear and tear.
1.2) Concrete Floor Repair
Before applying epoxy, it’s essential to address any imperfections in the concrete floor. It is important to clean, moisture test, fill cracks and holes, etch, and diamond grind. Here are more details about these 5 points:
Cleaning: Remove all dust, debris, and stains using a pressure washer or a scrub brush with a mild detergent solution.
Moisture Test: Use a plastic sheet test to ensure there are no moisture issues. Tape a plastic sheet on the floor and leave it for 24 hours; if condensation forms underneath, further drying time is needed.
Filling Cracks and Holes: Use a resin-based filler to repair any cracks or holes in the concrete surface. Apply the filler smoothly with a putty knife and allow it to fully cure before proceeding.
These steps help create an even canvas for your epoxy application, ensuring no weak spots that could lead to peeling or bubbling later on.
Additional Preparation Techniques
Other methods that can be employed alongside or instead of shot blasting include:
Etching: Involves applying an acid solution to roughen up the surface. This method can be labor-intensive but is effective for smaller areas.
Diamond Grinding: Uses diamond-tipped blades to grind away the top layer of concrete, similar to sanding wood but on a much larger scale.
Links to Helpful Resources
For those looking into different types of flooring solutions beyond epoxy, here are some resources that might be helpful:
Perfection Floor Tiles: Explore professional-grade interlocking vinyl flooring options available in various colors and styles, which provide a personalized look for your garage space.
Designing Custom Dealership Art for Canyon Creek Toyota: Get inspired by unique custom art ideas for car dealerships that can enhance the customer experience.
Racor Garage Accessories: Discover storage solutions that can help organize your garage space efficiently, including their versatile hoods and other storage methods.
Hayley Overhead Racking: Learn about premium overhead garage storage units like Hayley Overhead Racking that maximize your ceiling space and provide ample storage capacity.
Proper surface preparation lays the foundation for a successful DIY epoxy floor installation. By choosing effective methods like shot blasting and addressing any imperfections in your concrete floor, you’re setting yourself up for
Preparation Step 2. Concrete Floor Repair and Cleaning for Adhesive Success
Proper surface preparation is crucial for ensuring the successful adhesion and long-term performance of your epoxy floor. This involves thorough cleaning, repairing any existing damage, and possibly etching or grinding the surface to create a rough texture for better grip.
2.1) Cleaning the Concrete Floor
Start by sweeping and vacuuming the entire area to remove loose debris and dirt.
Use a degreaser to eliminate any oil or grease stains that might interfere with the epoxy’s adhesion. Apply the degreaser according to the manufacturer’s instructions and scrub the area thoroughly.
Rinse the floor with clean water to remove all cleaning agents, then allow it to dry completely.
2.2) Conducting a Moisture Test
Excess moisture vapour transmission (MVT) can compromise the adhesive properties of epoxy coatings. To check for excess moisture:
Tape a plastic sheet (about 2×2 feet) to different areas of the floor.
Leave it in place for at least 24 hours.
Check underneath the plastic for condensation or darkened concrete, indicating moisture issues.
If moisture is detected, address it before proceeding with epoxy installation.
2.3) Repairing Cracks and Holes
Addressing any imperfections in your concrete substrate is vital:
Inspect the floor for cracks or holes.
Use a resin-based filler product to fill these imperfections. Follow the manufacturer’s instructions carefully for mixing and application.
Smooth out the filled areas with a trowel and allow them to cure fully.
2.4) Surface Preparation Techniques
Depending on the condition of your concrete, additional surface preparation methods may be necessary:
2.4 a) Shot Blasting
An effective method for removing contaminants and creating a slightly roughened surface profile that promotes strong adhesion of the epoxy coating.
2.4 b) Acid Etching
A chemical process that involves applying an acid solution (usually muriatic acid) to etch the concrete surface. This method helps open up pores in smooth concrete, improving grip for epoxy coatings.
Always follow manufacturer guidelines and take necessary safety precautions during this stage to ensure optimal results.
If you’re looking for other ways to optimize your garage space, consider exploring great garage ceiling storage lift options from The Garage Store. These lifts are designed to bring big items up and out of the way, leaving the floor clear for vehicles and people. Additionally, if you’re interested in enhancing your garage’s aesthetics and functionality, you may want to consider buying cabinets by Hayley which are known for their high quality and utility.”
Step-by-Step Guide to Applying Epoxy Coating
Step 1) Applying Epoxy Primer for Enhanced Adhesion
Applying an epoxy primer is a crucial initial step in the epoxy flooring process. The primary purpose of an epoxy primer is to create a strong bond between the concrete substrate and the subsequent layers of epoxy. This ensures that the final finish will be both durable and long-lasting.
Why Use an Epoxy Primer?
Epoxy primer serves multiple purposes:
Improved Adhesion: It enhances the bond between the concrete and epoxy, reducing the likelihood of peeling or blistering.
Sealant: It acts as a sealant, filling small pores and cracks in the concrete surface.
Moisture Barrier: Helps in mitigating moisture vapour transmission (MVT), which can compromise the adhesion of epoxy.
Recommended Technique
To achieve smooth and even coverage, use a paint roller:
Preparation: Ensure that your concrete floor is clean, dry, and free from any dust or debris. Any existing stains should be thoroughly cleaned.
Mixing: Follow the manufacturer’s instructions for mixing the epoxy primer components. Typically, this involves combining a resin with a hardener.
Application: Pour a small amount of mixed primer onto the floor.
Use a paint roller with an extension handle to spread it evenly across the surface.
Work in sections to ensure thorough coverage without missing spots.
Dry Time: Allow the primer to dry according to manufacturer recommendations before moving on to the next layer.
Step 2) Mixing Epoxy Resin/Hardener
The next step involves mixing the main components of your epoxy coating: resin and hardener. These two parts work together to create a strong, durable surface.
Key Points:
Proportion: It’s crucial to follow the mixing ratio provided by the manufacturer precisely.
Consistency: Mix until you achieve a uniform consistency without streaks.
Steps for Mixing:
- Read Instructions: Carefully read through all instructions provided with your epoxy kit.
- Measure Accurately: Use proper measuring tools to ensure accurate proportions.
- Combine Components: Pour resin into a mixing container followed by hardener.
- Stir Thoroughly: Use a paddle mixer attached to a drill or stir manually until fully blended.
Proper Mixing Ratios and Techniques
Before you start, it’s essential to understand the correct mixing ratios for your specific epoxy product. Every manufacturer provides precise instructions, usually requiring equal parts of resin and hardener.
Measure Accurately: Use clean, graduated containers to measure out the required amounts of resin and hardener.
Mix Thoroughly: Combine the two components in a large bucket and mix them using a mechanical stirrer or paddle attachment on a low-speed drill. Stir consistently for at least 3-5 minutes, ensuring the mixture is homogeneous.
Step 3) Applying Thin Coats of Epoxy for Optimal Results
When applying epoxy, thin coats are preferable for several reasons, including better curing and reduced risk of air bubbles.
Application Process:
Initial Thin Coat: Pour a small amount of mixed epoxy onto the primed floor.
Use a squeegee to spread it evenly across the surface.
Follow up with a paint roller to ensure smooth coverage.
Subsequent Coats: Allow each coat to cure as per product guidelines before applying additional layers.
Lightly sand between coats if required for better adhesion.
Applying Thin Coats
Applying thin coats of epoxy is critical for avoiding issues like excessive heat generation, which can lead to uneven curing or bubbling.
Tools for Consistent Results
Using the right tools ensures an even application:
Squeegee: Ideal for spreading large amounts of epoxy efficiently.
Paint Roller: Perfect for achieving a smooth finish, especially around edges and corners.
Proper mixing and application techniques are foundational steps that set the stage for a successful DIY epoxy flooring project. The next section will delve into adding decorative elements like color flakes or metallic pigments to enhance both functionality and aesthetics.
Step 4) The Curing Process & Final Touches
Allowing sufficient curing time between coats is critical to ensure the epoxy coating reaches its full strength and durability. Here’s a step-by-step guide to help you through the final stages of your DIY epoxy floor project:
Initial Cure Time: After applying each thin coat of the epoxy mixture, allow it to cure as per the manufacturer’s instructions. Typically, this can range from 12 to 24 hours.
Avoid Foot Traffic: During the curing process, keep the area free from foot traffic and avoid placing any objects on the surface.
Inter-Coat Curing: Allow each coat to cure according to manufacturer guidelines before applying subsequent layers.
Final Cure: Once all coats are applied, let the entire floor cure completely. This process can take anywhere from 24 hours to several days, depending on ambient conditions. Wait the proper amount of time before the floor handles heavy objects or intense usage.
Optional Enhancements
For those looking to add a bit more flair or functionality, consider these optional steps:
Color Flakes: While the epoxy is still wet, sprinkle colour flakes evenly across the surface for added texture and visual appeal. Once cured, scrape off any loose flakes to create a smooth finish.
Protective Topcoat: Applying a topcoat not only adds an extra layer of protection but also enhances the floor’s appearance. Choose between a glossy clear coat for high shine or a matte topcoat for a subdued look.
To further enhance your garage flooring and organization, you might find The Garage Store’s range of garage storage products in Calgary helpful. We offer various options including the latest in garage cabinets, organization products, and storage solutions that can complement your newly installed epoxy floor.
By following these guidelines, you’ll ensure that your epoxy floor not only looks professional but also stands the test of time.
Maintaining the Beauty of Your DIY Epoxy Flooring
Keeping your epoxy floor looking its best requires a consistent maintenance routine. Here are some practical tips to ensure longevity and pristine condition:
Regular Sweeping/Vacuuming: Loose dirt and debris can scratch the surface over time. Use a soft-bristle broom or a vacuum with a brush attachment to remove these particles regularly.
Mopping with Mild Detergent Solution: For deeper cleaning, mix a mild detergent with water. Mop the floor to remove any accumulated grime. Make sure to avoid excessive water, as epoxy floors can be sensitive to prolonged moisture exposure.
Avoid Harsh Chemicals/Cleaners: Harsh chemicals or abrasive cleaners can damage the epoxy’s glossy finish. Stick to gentle cleaning agents and steer clear of acidic or bleach-based products.
Address Spills Promptly: Though epoxy flooring is highly resistant to stains, it’s still wise to clean up any spills immediately to prevent potential long-term discolouration.
Use Protective Mats: Place mats at entrances to minimize dirt and grit tracking onto the floor. This simple step can significantly reduce wear and tear.
Adhering to these maintenance practices will help preserve the beauty and durability of your epoxy floor, ensuring it remains an attractive feature in your space for years to come.
Conclusion
Taking on a DIY epoxy floor project can be both challenging and rewarding. With the knowledge and step-by-step guidance provided in this guide, you are well-equipped to transform any space with a stunning, durable floor finish.
Remember, the process may require patience and effort, but the result is undeniably worth it. From understanding the different types of epoxy floors to mastering surface preparation and application techniques, each step brings you closer to achieving professional-quality results.
For those seeking high-quality epoxy flooring products and additional support, The Garage Store stands out as a trusted supplier. We offer not only superior materials but also valuable resources such as instructional videos and customer support services to assist you throughout your project.
Armed with this comprehensive DIY epoxy floor guide, you can confidently embark on your journey to enhance your space with a beautiful and resilient epoxy floor. Or if you’d rather have our team of professionals install the flooring for you just reach out!
Happy flooring!